Create and upload table from csv using the platform wizard#
![]()
Prerequisites#
We are using the following example csv my_table.csv, exported from Excel using
semicolon as a delimiter and encoded in utf-8.
id;center_lon;center_lat;rs;name;date_valid;population;area_km2;has_dist;geometry_wkt
1;9.446698;54.798648;01001;Flensburg;2008-01-01;89504;56.73;TRUE;POINT(9.446698 54.798648)
2;10.141397;54.338963;01002;Kiel;2006-01-01;247548;118.65;TRUE;POINT(10.141397 54.338963)
3;10.753957;53.873731;01003;Lübeck;2006-02-01;217198;214.19;TRUE;POINT(10.753957 53.873731)
4;9.990176;54.076646;01004;Neumünster;1970-04-26;79487;71.66;TRUE;POINT(9.990176 54.076646)
5;9.105109;54.138105;01051;Dithmarschen;2011-08-01;133210;1428.18;TRUE;POINT(9.105109 54.138105)
6;10.602975;53.617187;01053;Herzogtum Lauenburg;2009-01-01;197264;1263.07;TRUE;POINT(10.602975 53.617187)
7;8.691597;54.647511;01054;Nordfriesland;2016-01-01;165507;2083.53;TRUE;POINT(8.691597 54.647511)
8;10.860564;54.238161;01055;Ostholstein;2010-01-01;200581;1393;TRUE;POINT(10.860564 54.238161)
9;9.531033;53.709420;01056;Pinneberg;2009-01-01;314391;664.27;TRUE;POINT(9.531033 53.709420)
10;10.369426;54.251352;01057;Plön;2009-01-01;128647;1083.56;TRUE;POINT(10.369426 54.251352)
We are logged in on the open energy platform
Create table using the wizard#
- On the platform go to the
database section.

- Click on + data set in the
draftsection. - Unfold the
Create Tablesection of the wizard. - Enter a valid table name (only lowercase, only characters, number and underscore).
- Add your data columns with the appropriate PostgreSQL data types
- Small popup windows give hints or explanations.
- The first column must always be a numerical type named
id. The wizard has this as a default. - We don't have to use all the columns from the csv file and we also don't have
to use the same names, these can be mapped later. In this example, we use the
following columns:
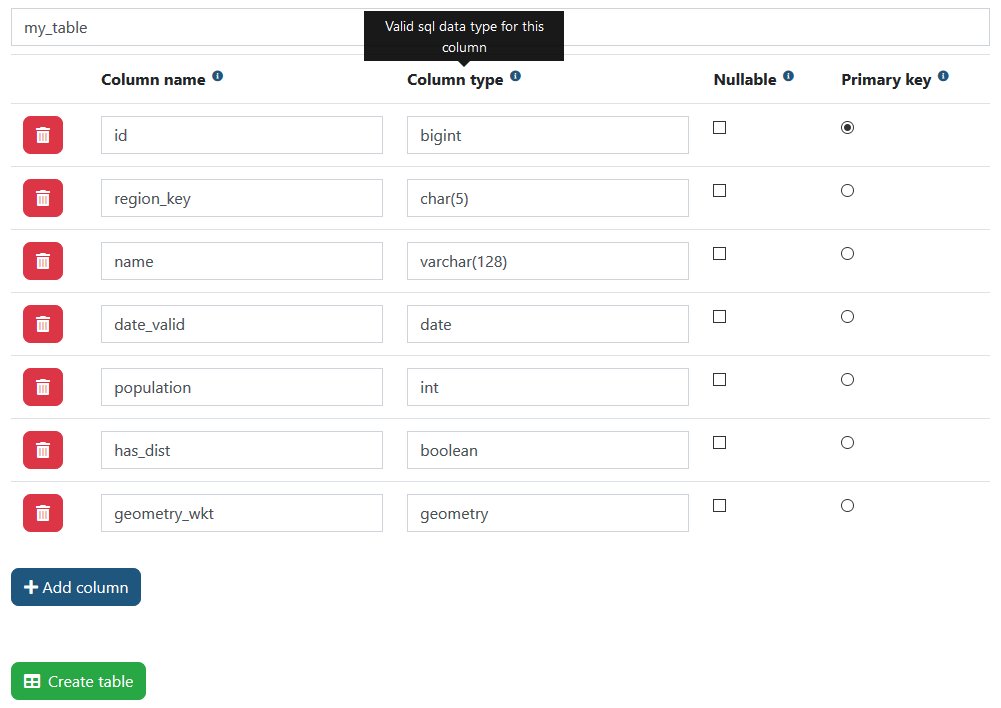
- Beneath the columns of the table is the option to
Apply Embargo. The default is set toNonebut in the drop down menu the options 6 Months and 1 Year are also given. Comment: Here a link to the course explaining embargo will be inserted. - Next to all tabs is a small
i. If you hover your mouse over it you will get information about the correponding field. - Click on
Create table. - If successful, you are redirected to the upload section.
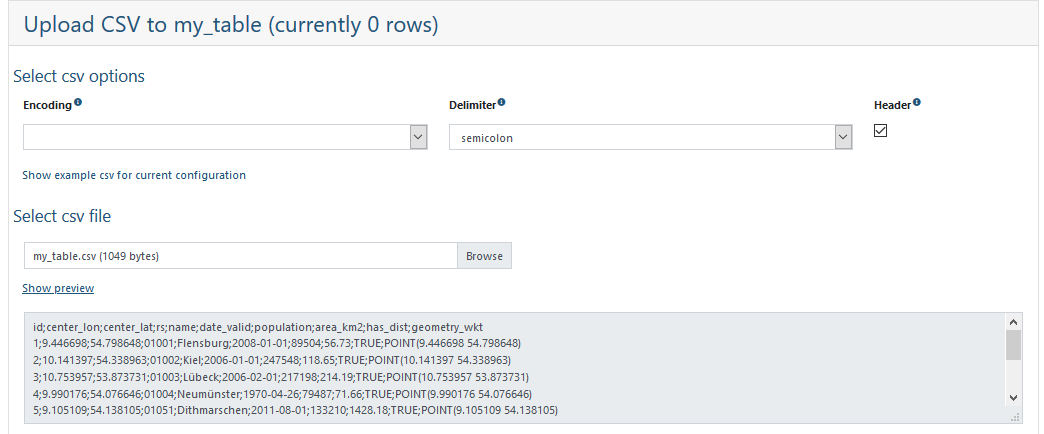
Upload a csv file using the wizard#
- On the platform go to the database section.
- Click on + data set in the
draftsection. - Unfold the
Upload CSVsection of the wizard. - Click on
Browseand select your csv file from your local drive. - You may specify the csv file encoding and delimiter character, or leave it
blank for automatic detection (which may be wrong though). The
Headercheckbox is activated to indicate that the first line in the file contains column names. - You can click on
Show example csv for current configurationto see an example snippet of a valid csv file for your table. - You can click on
Show previewto see the first few lines of your file. This may help to detect encoding errors.
- Map the columns from your csv file to the columns in your database. Columns with the same name are automatically filled out for you.
- In our example, we ignore the columns
center_lon,center_latandarea_km2and renamerstoregion_key. - While you change the column mappings, the preview below shows the application of the mapping for the first few rows.
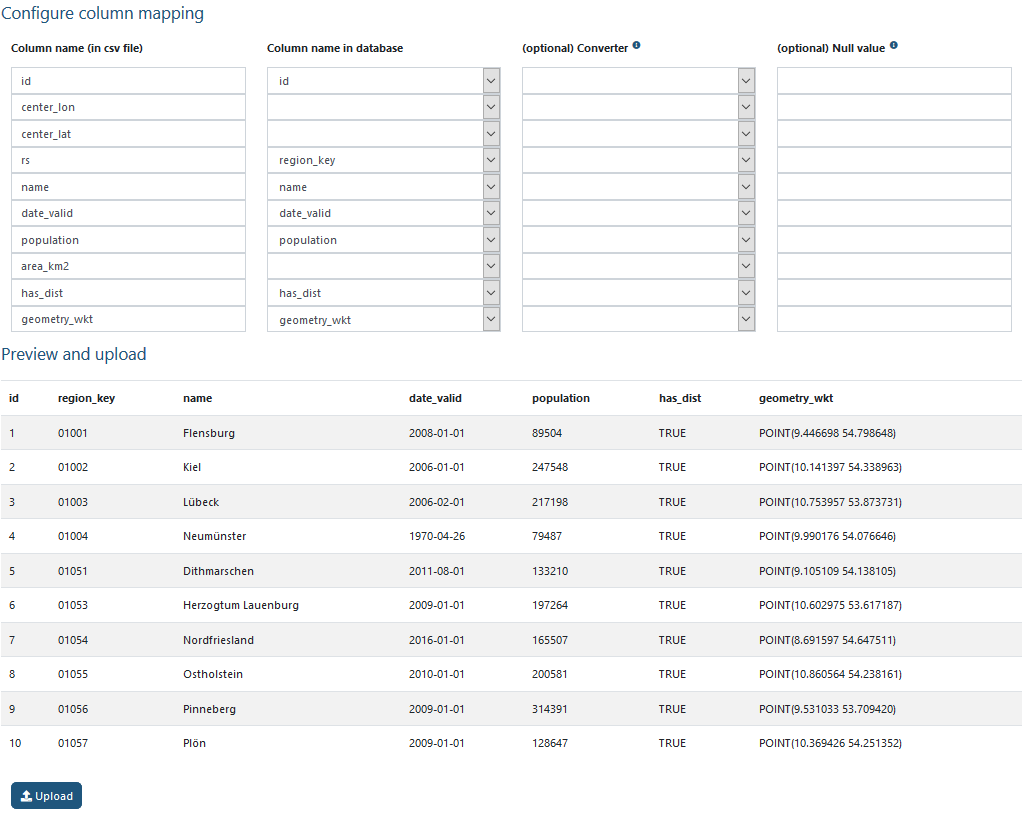
- If everything checks out, click
Upload.
About this tutorial#
- Author: Christian Winger
- Copyright: Öko-Institut (2023)
- License: CC BY 4.0
- Attribution: Öko-Institut (2023): Guidebook - How to Publish Your Data on the OEP
- Last update: 2026-06-03